为什么需要工作流#
假设我有一个请假需求,流程如下:
请假可以提交给我的上司,上司可以选择批准或者拒绝,无论批准还是拒绝,都会给我一个通知。
这个流程比较简单,我们很容易想到解决方案,不用工作流也能解决,有一个专门的请假表,当 A 要请假的时候,就往请假表中添加一条记录,这条记录的内容包含了请假的天数、原因、请假的审批人 B 以及一个名为 status 的字段,这个 status 字段表示这个请假申请目前的状态(待审批、已批准还是已拒绝),然后 B 登录系统之后,在请假表中查询到了 A 的请假信息,然后选择批准,此时将 status 字段的值改一下就行了。
这个流程很简单,相信小伙伴们都能想到。
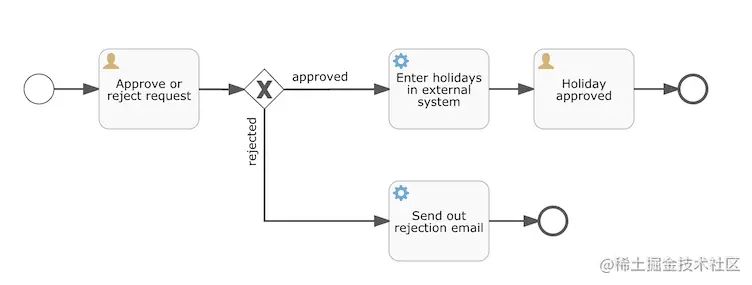
然而,这是一个非常简单的流程,对于这样的流程,一般来说也确实没有必要使用工作流,但是现实中,我们涉及到的工作流往往都是非常复杂的,我举个例子,就说报销审批吧,这个可能很多小伙伴都经历过。
小伙伴们看到,这个流程相对来说还是比较复杂的,此时你再用一个 status 字段去描述,就很难说的请到底是怎么回事了。每一步审批,都有可能批准也有可能拒绝,拒绝并不意味着流程结束,员工修改报销资料之后,还可以继续提交。此时如果还用 status 去描述,那么 status 将有 N 多个值去表示不同的情况,这个维护起来非常不便。
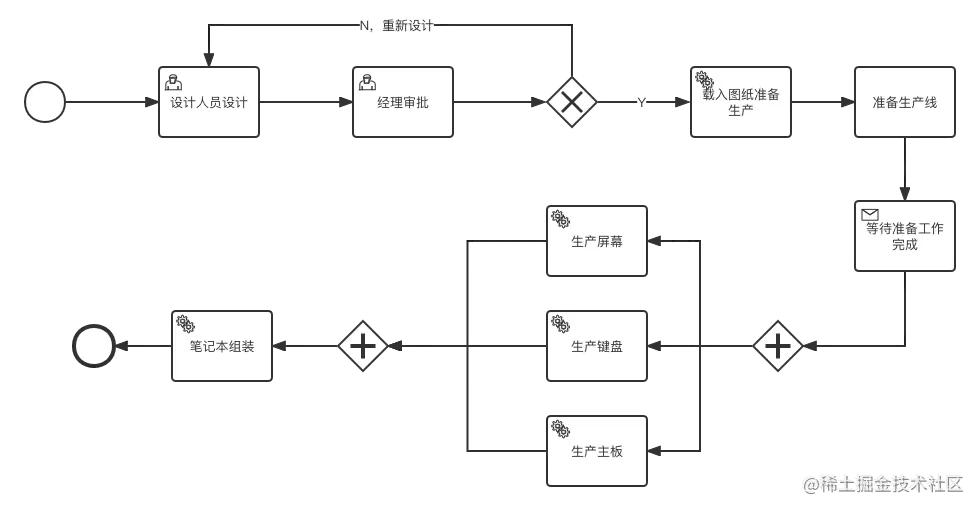
这就复杂了吗?非也非也,我们再来看一个生产笔记本电脑的例子,假设公司研发了一款新型笔记本电脑,整个研发到生产的流程可能是这样:
相比上面两个,这个就更复杂一些了,不仅有串行任务还有并行任务,如何去设计这样一个系统?单纯的通过状态字段去描述显然已经不够用了,此时我们就得考虑一种通用的、更易维护的方案来实现这样的系统了,这种通用的、易维护的方案,也就是工作流。
工作流选型#
一个比较早的工作流是 jBPM,这是一个由 Java 实现的企业级流程引擎,是 JBoss 公司开发的产品之一。
jBPM 的创建者是 Tom Baeyens,这个大佬后来离开了 JBoss,并加入到 Alfresco,并推出了基于 jBPM4 的开源工作流系统 Activiti,而 jBPM 则在后续的代码中完全放弃了 jBPM4 的代码。从这个过程中也能看出来,jBPM 在发展过程中,由于意见相左,后来变成了两个 jBPM 和 Activiti。
然而戏剧的是,Activiti5 没搞多久,从 Activiti 中又分出来一个 Camunda,Activiti 继续发展,又从中分出来一个 Flowable。。。
由于开发 jBPM、Activiti、Camunda 以及 Flowable 的人多多少少有一些关联性,让人不得不猜测意见相左拉一票人出来单干是他们的企业文化。
所以现在市面上主流的流程引擎就一共有三个:
Activiti
Flowable
Camunda
这三个各有特点:
Activiti 目前是侧重云,他目前的设计会向 Spring Cloud、Docker 这些去靠拢。
Flowable 核心思想还是在做一个功能丰富的流程引擎工具,除了最最基础的工作流,他还提供了很多其他的扩展点,我们可以基于 Flowable 实现出许多我们想要的功能(当然这也是小伙伴们觉得 Flowable 使用复杂的原因之一)。
Camunda 相对于前两个而言比较轻量级,Camunda 有一个比较有特色的功能就是他提供了一个小巧的编辑器,基于 bpmn.io 来实现的(松哥之前已经发文讲过了)。如果你的项目需求是做一个轻巧的、灵活的、定制性强的编辑器,工作流是嵌入式的,那么可以选择 Camunda。
Camunda#
流程(PROCESS) : 通过工具建模最终生成的BPMN文件,里面有整个流程的定义流程实例(Instance) :流程启动后的实例流程变量(Variables) :流程任务之间传递的参数任务(TASK) :流程中定义的每一个节点流程部署 :将之前流程定义的.bpmn文件部署到工作流平台
spring boot 集成 Camunda7#
参考官网:https://docs.camunda.org/manual
核心类介绍#
ProcessEngine
流程引擎,可以通过他获取相关service,里面集成了很多相关service,默认实现如下:
 1
 2
 3
 4
 5
 6
 7
 8
 9
10
11
12
13
14
15
16
17
18
19
20
21
22
23
24
25
26
27
public class ProcessEngineImpl implements ProcessEngine {
    public static final CompositeCondition EXT_TASK_CONDITIONS = new CompositeCondition();
    private static final ProcessEngineLogger LOG;
    protected String name;
    protected RepositoryService repositoryService;
    protected RuntimeService runtimeService;
    protected HistoryService historicDataService;
    protected IdentityService identityService;
    protected TaskService taskService;
    protected FormService formService;
    protected ManagementService managementService;
    protected AuthorizationService authorizationService;
    protected CaseService caseService;
    protected FilterService filterService;
    protected ExternalTaskService externalTaskService;
    protected DecisionService decisionService;
    protected String databaseSchemaUpdate;
    protected JobExecutor jobExecutor;
    protected CommandExecutor commandExecutor;
    protected CommandExecutor commandExecutorSchemaOperations;
    protected Map<Class<?>, SessionFactory> sessionFactories;
    protected ExpressionManager expressionManager;
    protected HistoryLevel historyLevel;
    protected TransactionContextFactory transactionContextFactory;
    protected ProcessEngineConfigurationImpl processEngineConfiguration;
    // ...
}
copy
RepositoryService
此服务提供用于管理和操作部署和流程定义的操作,使用camunda的第一要务
RuntimeService
运行相关,启动流程实例、删除、搜索等
TaskService
所有围绕任务相关的操作,如完成、分发、认领等
HistoryService
提供引擎搜集的历史数据服务
IdentityService
用户相关,实际中用不太到
maven集成#
 1
 2
 3
 4
 5
 6
 7
 8
 9
10
11
12
13
14
15
16
17
18
<!--流程引擎-->
<dependency>
<groupId> org.camunda.bpm.springboot</groupId>
<artifactId> camunda-bpm-spring-boot-starter</artifactId>
<version> 7.18.0</version>
</dependency>
<!--Web管理平台-->
<dependency>
<groupId> org.camunda.bpm.springboot</groupId>
<artifactId> camunda-bpm-spring-boot-starter-rest</artifactId>
<version> 7.18.0</version>
</dependency>
<!--提供rest api操作接口包-->
<dependency>
<groupId> org.camunda.bpm.springboot</groupId>
<artifactId> camunda-bpm-spring-boot-starter-webapp</artifactId>
<version> 7.18.0</version>
</dependency>
copy
整体pom文件:
 1
 2
 3
 4
 5
 6
 7
 8
 9
10
11
12
13
14
15
16
17
18
19
20
21
22
23
24
25
26
27
28
29
30
31
32
33
34
35
36
37
38
39
40
41
42
43
44
45
46
47
48
49
50
51
52
53
54
55
56
57
58
59
60
61
62
63
<?xml version="1.0" encoding="UTF-8"?>
<project xmlns= "http://maven.apache.org/POM/4.0.0" xmlns:xsi= "http://www.w3.org/2001/XMLSchema-instance"
xsi:schemaLocation= "http://maven.apache.org/POM/4.0.0 https://maven.apache.org/xsd/maven-4.0.0.xsd" >
<modelVersion> 4.0.0</modelVersion>
<parent>
<groupId> org.springframework.boot</groupId>
<artifactId> spring-boot-starter-parent</artifactId>
<version> 2.7.3</version>
<relativePath/> <!-- lookup parent from repository -->
</parent>
<groupId> com.example</groupId>
<artifactId> camunda-demo</artifactId>
<version> 0.0.1-SNAPSHOT</version>
<name> camunda-demo</name>
<description> camunda-demo</description>
<properties>
<java.version> 17</java.version>
</properties>
<dependencies>
<dependency>
<groupId> org.springframework.boot</groupId>
<artifactId> spring-boot-starter</artifactId>
</dependency>
<dependency>
<groupId> org.camunda.bpm.springboot</groupId>
<artifactId> camunda-bpm-spring-boot-starter</artifactId>
<version> 7.18.0</version>
</dependency>
<dependency>
<groupId> org.camunda.bpm.springboot</groupId>
<artifactId> camunda-bpm-spring-boot-starter-rest</artifactId>
<version> 7.18.0</version>
</dependency>
<dependency>
<groupId> org.camunda.bpm.springboot</groupId>
<artifactId> camunda-bpm-spring-boot-starter-webapp</artifactId>
<version> 7.18.0</version>
</dependency>
<dependency>
<groupId> mysql</groupId>
<artifactId> mysql-connector-java</artifactId>
<version> 8.0.32</version>
</dependency>
<dependency>
<groupId> org.springframework.boot</groupId>
<artifactId> spring-boot-starter-test</artifactId>
<scope> test</scope>
</dependency>
</dependencies>
<build>
<plugins>
<plugin>
<groupId> org.springframework.boot</groupId>
<artifactId> spring-boot-maven-plugin</artifactId>
</plugin>
</plugins>
</build>
</project>
copy
数据库#
我使用的是mysql,建了个新库 camunda(可自定义),启动后会自动生成所需表结构。
配置文件#
 1
 2
 3
 4
 5
 6
 7
 8
 9
10
11
12
13
14
15
16
17
18
19
20
server :
port : 8081
# camunda登录信息配置
camunda.bpm :
admin-user :
id : admin #用户名
password : 123456 #密码
firstName : yu
filter :
create : All tasks
# mysql连接信息
spring :
datasource :
driver-class-name : com.mysql.cj.jdbc.Driver
url : jdbc:mysql://localhost:8101/camunda
username : root
password : 123456
type : com.mysql.cj.jdbc.MysqlDataSource
copy
启动后会自动创建需要的表。
数据库表介绍#
ACT_ID_ # 这部分表示用户模块,配置文件里面的用户信息就在此模块。
ACT_HI_#
表示流程历史记录
act_hi_actinst: 执行的活动历史
act_hi_taskinst:执行任务历史
act_hi_procinst:执行流程实例历史
act_hi_varinst:流程变量历史表
ACT_RE_#
表示流程资源存储
act_re_procdef:流程定义存储
act_re_deployment: 自动部署,springboot每次启动都会重新部署,生成记录
ACT_RU_#
表示流程运行时表数据,流程结束后会删除
act_ru_execution:运行时流程实例
act_ru_task:运行时的任务
act_ru_variable:运行时的流程变量
ACT_GE_#
流程通用数据
act_ge_bytearray:每次部署的文件2进制数据,所以如果文件修改后,重启也没用,因为重新生成了记录,需要清掉数据库,或者这个表记录
登录地址为 http://localhost:8081/,输入用户名密码即为配置文件里面的 admin,123456
业务集成#
需要下载工具 Camunda Modeler 来画流程图,下载地址:https://camunda.com/download/modeler/